java
JTabbedPane and JToggleButton in Java with Examples
JTabbedPane in Java with Example
Table of Contents
a) Introduction to JTabbedPane
b) Different types of Constructor
c) Examples with Source Code
d) Ouput
******************
Introduction
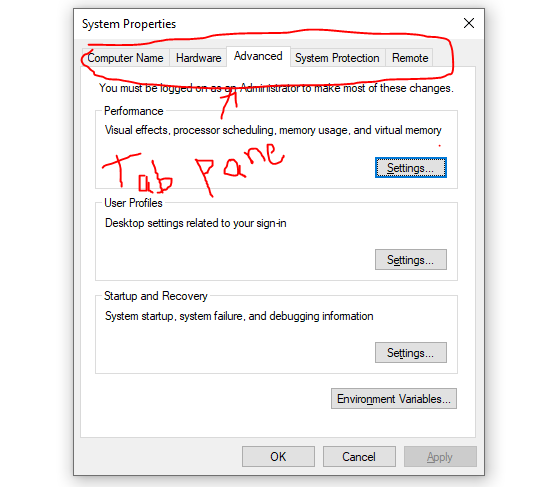
JTabbedPane is the swing component that is used to
create a tab pane in applications. A tabbed pane is used to group other
component forming different tabs. Example of tabbed pane:
JTabbedPane has two constructors, they are:
A) JTabbedPane():
This is the default constructor. By default the tabs
are placed at top of the application because we cannot specify its orientation.
b) JTabbedPane(int orientation):
This is the second constructor of the tabbed pane.
Here we can specify the placement of the tabs. It means we can place the tabs
in top, left, bottom and right. For placing the tabs in different place, we
have to pass the value through the constructor and the values are TOP(1),
LEFT(2), BOTTOM(3) and RIGHT(4).
To add the component in the tabbed pane, we use addTab(String
title, Component comp) method.
Now let us see the first example of JTabbedPane;
Source Code:
/*
* To change this license
header, choose License Headers in Project Properties.
* To change this template
file, choose Tools | Templates
* and open the template
in the editor.
*/
package JTabbedPane;
/**
*
* @author AnkitPC
*/
import java.awt.*;
import javax.swing.*;
public class JTabbedPaneDemo1 {
JFrame f;
JTabbedPane tp;
JPanel p1,p2;
JButton b1,b2,b3,b4;
//creating
constructors
JTabbedPaneDemo1(){
f=new
JFrame("TabbedPane Demo");
//
f.setSize(300,400);
f.setDefaultCloseOperation(JFrame.DISPOSE_ON_CLOSE);
/*used for custom view
of frame.
if you use setSize
then you have to provide only height and width of the application.
The frame shows in
top corner of left side.So to display the frame as required we use
set bounds.
setBounds requires four integer values , they are x-axis, y-axis, width and
height.
*/
f.setBounds(500,200,400,400);
//setting layout
f.setLayout(new
BorderLayout());
// here is the
second constructor of tabbed pane
//i used value 3
for bottom as you can see in above paragraph
tp=new JTabbedPane(3);
f.add(tp);
p1=new JPanel();
p2=new JPanel();
b1=new
JButton("Click Here");
b2=new
JButton("HI");
b3=new
JButton("Bye");
b4=new
JButton("Hello");
//adding b1 and b2
to panel one
p1.add(b1);
p1.add(b2);
//adding b3 and b4
to panel two
p2.add(b3);
p2.add(b4);
// adding tab to the
tabbedpane
tp.addTab("One",p1);
tp.addTab("Two",p2);
f.setVisible(true);
}
//constructor ends
here
//main method
public static void
main(String[] args) {
//calling constructor
new
JTabbedPaneDemo1();
}
}
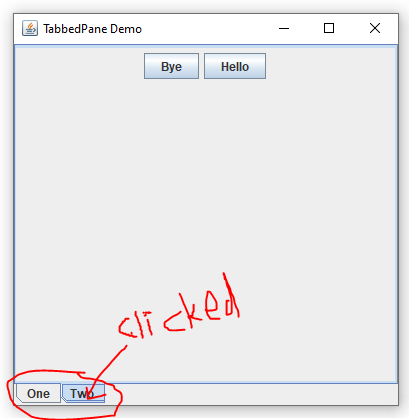
Ouput:
Also JTabbedPane can be demonstrated as following.
For this demonstration we are going to use three java classes. But among three
java classes only the one class will have main method.
Let us see the second example to JTabbedPane.
First class is JTabbedPaneDemo2.java where we going
to have the main class too.
Source Code:
/*
* To change this license
header, choose License Headers in Project Properties.
* To change this template
file, choose Tools | Templates
* and open the template
in the editor.
*/
package JTabbedPane;
/**
*
* @author AnkitPC
*/
import java.awt.*;
import javax.swing.*;
public class JTabbedPaneDemo2 {
JFrame f;
JTabbedPane tp;
//constructor
JTabbedPaneDemo2(){
f=new
JFrame("Student Demo");
f.setBounds(545,200,275,400);
f.setDefaultCloseOperation(JFrame.DISPOSE_ON_CLOSE);
f.setResizable(false);
f.setLayout(new
BorderLayout());
tp=new
JTabbedPane();
//adding tabs to
tabbed pane
tp.addTab("Student",new Students());
tp.addTab("Gurdain",new Guardians());
//adding tabbed
pane to frame
f.add(tp);
f.setVisible(true);
}
//main method
public static void
main(String[] args) {
//calling
constructor
new JTabbedPaneDemo2();
}
}
Now after this lets create a another java class
called Students.java
Source Code:
/*
* To change this license
header, choose License Headers in Project Properties.
* To change this template
file, choose Tools | Templates
* and open the template
in the editor.
*/
package JTabbedPane;
/**
*
* @author AnkitPC
*/
import java.awt.*;
import java.awt.event.*;
import javax.swing.*;
public class Students extends JPanel implements ActionListener {
JLabel l1,l2,l3;
JTextField t1,t2,t3;
JButton b;
//constructors
Students(){
l1=new
JLabel("Name");
l2=new
JLabel("Address");
l3=new
JLabel("Faculty");
t1=new
JTextField(20);
t2=new
JTextField(20);
t3=new
JTextField(20);
b=new
JButton("Submit");
//registering the
action event
b.addActionListener(this);
//adding
components to the panel
add(l1);
add(t1);
add(l2);
add(t2);
add(l3);
add(t3);
add(b);
}
//performing action
public void
actionPerformed(ActionEvent e){
String
name=t1.getText();
String
add=t2.getText();
String
faculty=t3.getText();
JOptionPane.showMessageDialog(null,"Name: "+name+"\n
Address: "+add+"\nFaculty: "+faculty);
}
}
Now after this again we are going to create another
java class called Guardians.java.
Source Code:
/*
* To change this license
header, choose License Headers in Project Properties.
* To change this template
file, choose Tools | Templates
* and open the template
in the editor.
*/
package JTabbedPane;
/**
*
* @author AnkitPC
*/
import java.awt.*;
import java.awt.event.*;
import javax.swing.*;
public class Guardians extends JPanel implements ActionListener
{
JLabel l1,l2,l3;
JTextField t1,t2,t3;
JButton b;
//constructor
Guardians(){
l1=new
JLabel("Name");
l2=new
JLabel("Relation");
l3=new
JLabel("Cell Number");
t1=new
JTextField(20);
t2=new
JTextField(20);
t3=new
JTextField(20);
b=new
JButton("Submit");
//registering the
event
b.addActionListener(this);
//adding
components to frame
add(l1);
add(t1);
add(l2);
add(t2);
add(l3);
add(t3);
add(b);
}
//performing the
actions
public void
actionPerformed(ActionEvent e){
String
name=t1.getText();
String
rel=t2.getText();
String
no=t3.getText();
JOptionPane.showMessageDialog(null,"Name: "+name+"\n
Relation: "+rel+"\nFaculty: "+no);
}
}
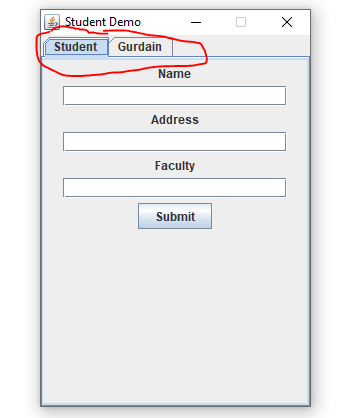
Output:
The first image shown is the initial output of the
program. You can see the tabbed pane in the circled part.
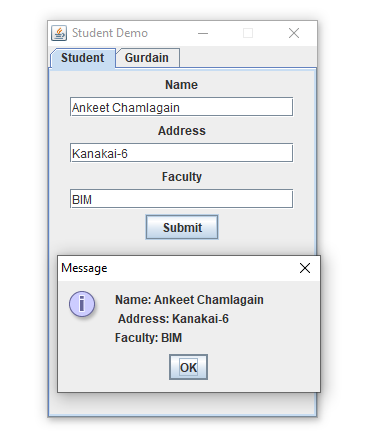
Now I have entered some information in the students
tab and clicked the submit button and I got a message dialog showing the
information entered.
Also same goes to the Guardians tab.
JToggleButton in Java with Example
Table of Contents
a) Introduction to JToggleButton
b) Example with Source Code
c) Ouput
*********************
Introduction
JToggleButton is the Swing components which are used
to create a toggle button. Toggle button is a component like button however, it
has two distinct state i.e pressed (on state) and released (off state). For
example, the electric bulb or fan or some electronic things there are two
states either ‘on’ or ‘off’. In a same manner toggle button is used. It can be
used as switch. JToggleButton generates
the Item Event every time when the button is clicked.
isSelected() method is used in toggle button because
it returns the true or false value. When the button is clicked then it returns
true otherwise it returns false.
Let us see the example of toggle button with source
code and output.
Source Code:
/*
* To change this license
header, choose License Headers in Project Properties.
* To change this template
file, choose Tools | Templates
* and open the template
in the editor.
*/
package JToggle;
/**
*
* @author AnkitPC
*/
import java.awt.*; // for layout
import java.awt.event.*; // for event
import javax.swing.*; // for components
public class JToggleButtonDemo implements ItemListener {
JFrame f;
JToggleButton b;
// constructor
JToggleButtonDemo(){
f=new
JFrame("Toggle Button Demo");
// set size of the frame
f.setSize(400,300);
f.setDefaultCloseOperation(JFrame.DISPOSE_ON_CLOSE);
// setting layout
f.setLayout(new
FlowLayout());
b=new
JToggleButton("On");
// registering the
event
b.addItemListener(this);
// adding button to the
frame
f.add(b);
f.setVisible(true);
}
// main method
public static void
main(String[] args) {
// call constructor
new
JToggleButtonDemo();
}
// performing some
actions
public void
itemStateChanged(ItemEvent e){
if(b.isSelected()){
b.setText("Off");
}
else{
b.setText("On");
}
}
}
Note: The highlighted words are the comments.
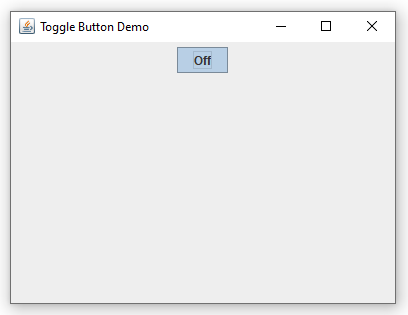
Output:
As I said earlier it works as a switch. If it is
clicked then it will remain in the same state until and unless another click is
not done to the button. The image below shows the output where the button is
pressed ‘on’. It remains infinitely if we don’t click the button again.
Now I have clicked the button and now it is showing
‘off’ state.






Post a Comment
0 Comments