java
JCheckBox and JRadioButton in Java with Examples
JCheckBox and JRadioButton in Java with Examples
Table of Contents
a) Introduction to JComboBox and JRadioButton
b) How to create JComboBox and JRadioButton ?
c) Example with Source Code
d) Ouput
********************
Introduction
The JCheckBox
and JRadioButton are the swing
components. Check box allows you to make the multiple selection whereas radio
button allows you single selection. Radio button is generally used in a case
where there are multiples selections and you have to choose only one. And Check
Box is opposite of radio button. Check box allows you to select the multiple
items from multiple items.
How to create JCheckBox and JRadioButton?
e.g;
JCheckBox c1,c2;
JRadioButton r1,r2;
C1=new JCheckBox(“Music”);
C2=new JCheckBox(“Reading”);
R1=new JRadioButton(“male”);
R2=new JRadioButton(“female”);
Note: In SWING all the radio buttons can be selected
by default.
So to make single selection of radio button, we need
to use ButtonGroup class.
For e.g.
ButtonGroup bg=new ButtonGroup();
Bg.add(r1);
Bg.add(r2);
[Note: isSelected()
method is used to return true if radio button or check box is selected
otherwise it returns false.]
Let us see the example of check box and radio
button;
Source Code:
/*
* To change this license
header, choose License Headers in Project Properties.
* To change this template
file, choose Tools | Templates
* and open the template
in the editor.
*/
/**
*
* @author AnkitPC
*/
import java.awt.*;
import java.awt.event.*;
import javax.swing.*;
public class JCheckBoxandJRadioButtonDemo implements
ActionListener {
JFrame f;
JLabel l1,l2,l3,l4;
JTextField t1,t2;
JRadioButton b1,b2;
JCheckBox c1,c2,c3;
JButton b;
//creating constructor
JCheckBoxandJRadioButtonDemo(){
f=new
JFrame("Form");
//setting the size
f.setSize(400,300);
f.setDefaultCloseOperation(JFrame.DISPOSE_ON_CLOSE);
//setting the
layout
f.setLayout(new
FlowLayout());
l1=new
JLabel("Name");
l2=new
JLabel("Address");
l3=new
JLabel("Gender");
l4=new
JLabel("Hobbies");
t1=new
JTextField(20);
t2=new
JTextField(20);
//for radio button
to select only one
ButtonGroup bg=new
ButtonGroup();
b1=new
JRadioButton("Male");
b2=new
JRadioButton("Female");
bg.add(b1);
bg.add(b2);
c1=new
JCheckBox("Music");
c2=new
JCheckBox("Reading");
c3=new
JCheckBox("Travelling");
b=new
JButton("Submit");
b.addActionListener(this);
//adding the
components
f.add(l1);
f.add(t1);
f.add(l2);
f.add(t2);
f.add(l3);
f.add(b1);
f.add(b2);
f.add(l4);
f.add(c1);
f.add(c2);
f.add(c3);
f.add(b);
f.setVisible(true);
}
public static void
main(String[] args) {
//calling
constructor
new
JCheckBoxandJRadioButtonDemo();
}
public void
actionPerformed(ActionEvent e){
String
name=t1.getText();
String
address=t2.getText();
String
gender="";
String hobbies="";
// JOptionPane
jp=new JOptionPane();
//for radio button
if(b1.isSelected()){
gender="Male";
}
else
if(b2.isSelected()){
gender="Female";
}
//for checkbox
if(c1.isSelected()){
hobbies="Music";
}
if(c2.isSelected()){
hobbies+="Reading";
}
if(c2.isSelected()){
hobbies+="Travelling";
}
JOptionPane.showMessageDialog(null,"Name: "+name+ " \n
Address: "+address+ "\n Gender: "+gender +"\nHobbies:
"+hobbies);
}
}
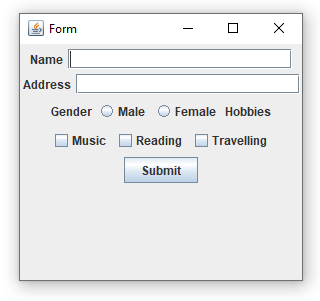
Output:
The image below is the initial output of the program
above.
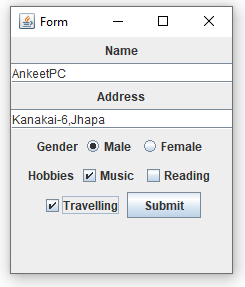
I have entered the details in the fields.
If I click the submit button I will get the message
dialog with the details I entered.
In this program, we have covered the some previous
lessons.
Here are the some differences in JCheckBox and JRadioButton are;
JCheckBox
|
JRadioButton
|
To create check box,
we use JCheckBox class.
|
To create check box, we use JRadioButton
class.
|
No need of helper
class to create checkbox.
|
ButtonGroup helper class is used to create radio button.
|
There can be
multiple selections in check box.
|
Single selection of item.
|


Post a Comment
0 Comments